If you’re thinking of growing pickling cucumbers, we have just the idea to make you take the final step: make pickles!
In the video above, you will see a step-by-step guide on how to make your own fresh pickles in your kitchen. But, before you start, remember it takes about 50 to 60 days for the pickling cucumbers to mature. Also, they require well-drained soil, fertilizer high in nitrogen and lots of water!
Once your pickles have grown, watch HGTV’s pickle making tutorial. In order to complete, you’ll need: pickling cucumbers, garlic, Dill fronds, Dill seeds, red pepper flakes, water, vinegar and pickling salt. You will also need sterilized jars with lids. You could even add your own twist to the recipe and produce special flavors.
Make a note to share this idea with your friends and family. Not only will they be able to make their own after seeing this video, but they won’t be begging you for your fresh pickles.
Watch the video above to see the full tutorial.
Do you want to make pickles with your pickling cucumbers?
The post Growing Pickling Cucumbers? Make Your Own Pickles! appeared first on Gracious Gardening.
]]>The post Using Your Flowers At Drink Garnish This Season appeared first on Gracious Gardening.
]]>Edible Rose Petals

You can use fragrant rose petals to compliment a gin-infused drink. We particularly like this idea from Hungry Australian.
Edible Hibiscus

Not all Hibiscus flowers are edible — this is very important to keep in mind. However, Tyrant Farms has found the Hibiscus sabdariffa is perfectly fine! Since the taste can be overwhelming, try pairing it with a strawberry-infused cocktail.
Edible English Lavender

Again, not all types of lavender are edible. The most common one used in cooking and drinking is dried English Lavender. You can garnish a vodka drink that is infused with lemon and blueberry. The lavender will be an extra wow-factor.
Will you try making some edible flower cocktails?
The post Using Your Flowers At Drink Garnish This Season appeared first on Gracious Gardening.
]]>The post Water Your Tomatoes The Right Way appeared first on Gracious Gardening.
]]>Water in the Right Spot:
Some people put a soaker spray on their hose, and just hose down their plants every day. However, tomatoes don’t need water on their leaves, that doesn’t help much. Wet leaves can be a problem, since the sun can heat up the water as it evaporates and end up burning the leaves. Burned leaves won’t gather sunlight as well, and your plant will suffer. Also, just putting water near the plant or in the pot doesn’t guarantee good watering. The plant must be watered at the roots, where it has a chance to really soak up the liquid. When you’re watering, aim the flow of your water around the stem of the tomato, to avoid too much water wastage.
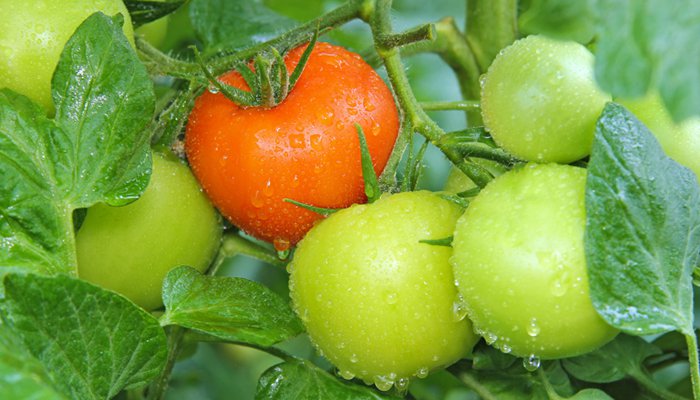
Water at the Right Time:
Another huge mistake that is usually made is watering during the wrong time of the day. The best times of the day to water is in the early morning, or the evening. At this time, the worst of the heat and sun is over, and there’s less of a chance for the plant to get burned. As well, it has more time to soak up the water you’re giving it before the sun heats up the soil and causes water evaporation. Water when it’s cool and shady out, to allow your tomato to get the most water and help. If you’re noticing that your tomato is still struggling to get through the day without wilting or having really dry dirt on top, then consider deeper watering, so that there’s more water available for the tomato. Also start using mulch in your garden. Mulch is really inexpensive, and if you cover the ground with it, it helps keep the moisture trapped. It provides a great barrier between the wet ground and the sun, keeping your tomato’s soil damp for longer periods of time.
Water at the Right Frequency:
It can’t be promised that every tomato should be watered once a day. There’s all sorts of variables, including whether they’re in a pot or the ground, and where you live. Warmer areas will most likely need more water more often, but if you’re somewhere like Seattle, you’re probably getting enough rain and moisture that you just have to supplement your tomato with weekly waterings. When you first get your tomato, keep an eye on it and check on it every day. If it appears dry, stick your finger in to see how deep the dryness is. You don’t want to overwater your plant, as it can cause root rot, but you don’t want to wait until it’s the Sahara near your tomato. Once you figure out approximately how often you need to water, stick to the schedule as much as you can, and your tomato will thank you.
Do you have tips for watering tomatoes?
The post Water Your Tomatoes The Right Way appeared first on Gracious Gardening.
]]>The post The Key To Growing Great Garlic appeared first on Gracious Gardening.
]]>Growing garlic can be ridiculously easy if you know just a little bit about what you are doing and how to care for growing things. But in case you need them, here are some tips on how to grow garlic on your own.
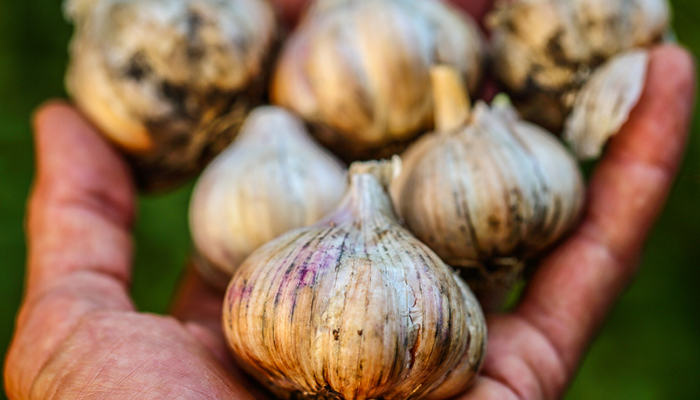
Planting
You will first need to decide what type of garlic to plant. There are two specific types of garlic. They is hardneck and softneck garlic. Where you live will determine what type you plant. Softneck varieties grow well in most climates and are good for hot, dry areas. Hardneck varieties are good for cooler climates.
You’ll want to find an organic grower and purchase several heads of garlic of different varieties. Keep them labeled and separate so you can distinguish what you plant easily.
Open the heads of garlic, and select the largest and most intact cloves for planting. Smaller or damaged cloves can be used for cooking. Depending on how much garlic you consume, plan to plant enough cloves to sustain your use. One clove will grow one new head of garlic. For the best results, plan to get your garlic in the ground a few weeks before the first freeze.
Soil
The soil preparation and maintenance is the most important part of growing garlic. Garlic is a very greedy plant and will not tolerate competition with any type of weeds, so be prepared to mulch heavily and weed when needed. The soil should be loose and very fertile. Turn and aerate the soil well and then top with one to two inches of natural fertilizer such as aged manure, compost or leaf mold. Mix in the fertilizer and lay out rows that are six to twelve inches apart. A healthy garlic plant can have a root span of up to six inches, so when you place the cloves in the soil, place them a good ten inches apart. Push the cloves into the soil to a depth of two inches. Rake over the soil to even it out and leave the plants for about a month with regular watering when the soil is dry one inch down.
Prepare for winter
You may see some small shoots before that first month is up. That’s OK. Give your garden area a dose of liquid kelp and fish emulsion as extra fertilizer. Follow the package directions for mixture and amounts. Cover your garlic with a heavy coat of straw or mulch and prepare for winter.
Harvest
In the summer, you will notice the leaves of the garlic start to turn brown. This is when you harvest. Use a gardening fork to loosen the root and remove it from the ground. Shake gently and set aside out of the sun. Find a shady, cool spot to cure the garlic for about three weeks for long term storage. Your garlic should be storable and edible for six to twelve months.
Do you have any tips to help us grow garlic in our gardens?
The post The Key To Growing Great Garlic appeared first on Gracious Gardening.
]]>The post How To Pickle Peppers appeared first on Gracious Gardening.
]]>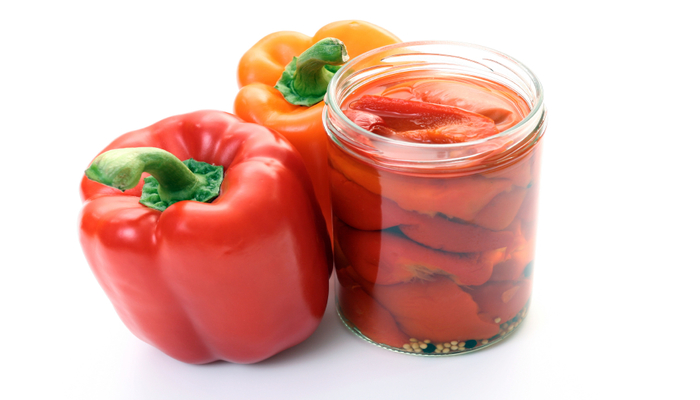
For those people who ventured into the world of gardening this year, dependent upon what type of seeds you sowed, you might be knee-deep in your dirt collecting the beautiful fruits of your labor.
Whether this is your first experience or you are a seasoned gardener, an issue that includes almost everyone is the absolute abundance of fruits and veggies that the garden produces. It is a common and frequently asked question: ‘what am I going to do with all of these…’ fill in the blank. I typically hear people’s amazement and disbelieve about how much produce they are yielding this season and they just don’t know what to do with it all.
A lot of the veggies that are maturing right now include, cucumbers, tomatoes, and the many types of peppers. After exhausting all of the available friends, family, and neighbors you know to give your produce away to, you are still left with an overwhelming amount of peppers. You can only eat and cook so much before they start threatening to spoil. They do freeze pretty well, but to get the maximum preservation out of your peppers, pickling is your answer.
Before You Pickle Peppers You Have To Pick Them
The first important step is collecting your matured produce from your garden. Properly preparing to pick your harvest involves dressing comfortably and wearing some form of protection from sun exposure since this endeavor will probably have you out in the garden for a considerable amount of time.
You will need a large sized basket, box, or burlap bag to put your items in and it is a good idea to be prepared with a back-up. You will also require a comfortable and durable pair of gardening gloves and a pair of gardening sheers that you can rely on. Now you are ready to collect your harvest.
The ideal pepper for pickling should be firm without any soft spots. The best approach for removing the pepper from the plant is to gently twist and cut the stem about an inch and a half from the top with your sheers.
Upon collecting your pile of peppers, you should get a general idea of the amount you have. A bushel of peppers is gauged by weight and is most commonly known to be 25 lbs. This will create 20 to 30 pints of pickled peppers.
Quick Steps To Pickle Peppers
- Select firm peppers and wash them thoroughly
- Halve your peppers and remove the stem and seeds
- Flash roast the skin side of the pepper to the point of blistering
- Quickly place into an ice bath and remove to easily peel the skins off
- Cut into strips and loosely place them into your pint jar leaving an inch empty at the top
- Pour in your pickling juice, be sure to remove all bubbles before you seal
- Submerge in boiling water bath for 10 minutes and allow to cool
Pickling Juice For Approximately Nine Pint Jars
- 5 cups white vinegar
- 1 cup water
- One small onion coarsely cut
- 3 cloves garlic
- 4 Tbsp. sugar
- 1 Tbsp. black peppercorns
- 1 Tbsp. pickling salt
A common practice is to use equal parts of hot and sweet peppers to achieve a well-balanced preserved pepper. It is also recommended to pour your pickling juice through a strainer first so that all of the onion, garlic, and peppercorns are removed. Now you can enjoy your peppers throughout the entire year.
Image: iStockPhoto
The post How To Pickle Peppers appeared first on Gracious Gardening.
]]>The post 5 Quick-Growing Veggies You Can Harvest In No Time appeared first on Gracious Gardening.
]]>1) SPINACH:
The spinach crop is best known for its ability to grow and mature really fast (within 30-45 days). The best thing about the crop is that once mature, you can continue harvesting its leaves for a number of weeks. When harvesting, it’s best that you start by picking the larger leaves so that the smaller ones can continue to grow. Still, it’s worth noting that the smaller leaves are normally loaded with a lot of flavor.
The crop is best suited for cooler temperature environments and if not, you should plant them under a shade. Assuming that you have limited garden space, you can go ahead and plant them in containers as they don’t need a lot of space.
2) RADISH:
The most lovable thing about the radish is that it’s usually rich in flavor, grows very quickly (within 20-25 days), requires minimal gardening space hence can be grown in containers and has over 200 varieties that come in a wide range of sizes, shapes, flavors and colors.
Though most radish varieties thrive best under a full sun, others do well under the shade. The key to planting and harvesting healthy radishes is to plant them during fall and spring (in case you live in cooler climates) and in winter (if you live in warmer climates).
3) LETTUCE:
Lettuce is amongst the fastest growing vegetables as it can be harvested 30 days after it was sowed. Thus, if you intend to have fresh lettuce all year round, you can be sowing new seeds after every 30 days.
The crop thrives best in environments with cool temperatures (50-60 degrees). In case you live in an area that experiences higher temperatures, you can grow it under a shade. You can similarly grow lettuce in containers as it doesn’t need a lot of space.
4) PEAS:
If you consider yourself a huge fan of peas, it’s good to know that if you were to sow the seeds today, in 60 days time, you would be harvesting them. The one thing that you are bound to love the most about them is that they take minimal space. But, you ought to let them grow vertically on trellis. Being that there are different varieties of seeds in existence (the early, mid and late varieties), it’s a good idea to grow all of them at one time rather than sowing the early variety after every two weeks.
5) BUSH BEANS:
Bush beans are amazingly tasty and nutritious. Once planted, you can start harvesting them after 50 days. However, they tend to grow well in areas with warmer temperatures. Since most bush beans produce their beans within a two week period, it’s wise to sow new seeds after every two weeks so that you can be having a continuous harvest.
Do you know of any fast growing vegetables?
The post 5 Quick-Growing Veggies You Can Harvest In No Time appeared first on Gracious Gardening.
]]>The post Growing Impressive Spaghetti Squash appeared first on Gracious Gardening.
]]>
This incredibly versatile item is actually a member of the fruit group. Of all the varieties of squash, the spaghetti squash definitely has the most to offer in the way of options. There is a way to truly get from this delightful fruit, every bit of its potential. The trick is in how you grow your spaghetti squash.
How to Grow the Greatest Spaghetti Squash
Like most other late harvest squashes, gourds, and pumpkins, they simply grow on the ground until they are ripe and ready to be picked. To truly get the most out of your spaghetti squash, build a trellis about six feet high for the squash vines to grow up and along to the trellis’s top. Once the vines reach the top of the trellis you can guide the fruit sprouts downward.
You will be amazed to watch the spaghetti squash’s growing process in action over time. Over the period of just a few short months the squash sprout will become engorged. Allowing nature and gravity to do their job the squash will begin to elongate. By the time summer is reaching its close, it is not uncommon for a spaghetti squash to grow upwards of an impressive four and five feet long. Impressive indeed!
As if this fruits amazing ability to grow to such lengths was not impressive enough, another incredible trait that this fruit has to offer is nearly the entire plant is edible. If you choose to stake out a small patch to construct a trellis and plant some spaghetti squash seeds in your garden, you want be let down come harvest time.
Aside from the raw produce you yield, all of the leaves can be used in salads or soups. The aromatic flowers can be reduced down in cream and sugar for a tasty treat. The pale yellow flesh of the fruit can be used in any number of ways your imagination can think of After drying and saving some of your seeds for planting next season, the rest can be roasted with various seasonings to your taste, whether it be sweet, salty, or spicy, any and all work well with this truly impressive fruit variety.
Image: iStockPhoto
The post Growing Impressive Spaghetti Squash appeared first on Gracious Gardening.
]]>The post Instructions: How To Harvest Swiss Chard appeared first on Gracious Gardening.
]]>So, you may wonder: When is it the right time to harvest Swiss chard? Well, this vegetable can be harvested when the leaves are tender and young, preferably smaller than about 4 inches long or just after maturity. The beauty of it is that you can harvest the plant continually right until it frosts.
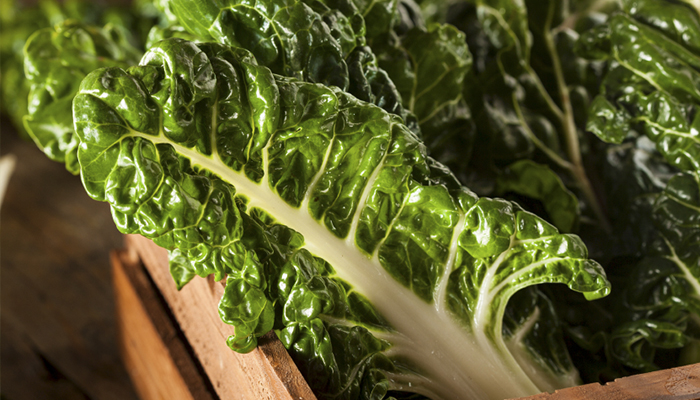
Instructions
Step 1: Unlike other vegetables where you only have to snap the stem, chard requires a different way to harvest so that you can have more leaves growing afterwards. It is recommended that you pick Swiss chard by snapping right at its base.
Step 2: When you snap the stem, go ahead and separate the leaf material, removing it from the stalk. Discard the stalks if you do not like eating them, or make soup just like celery.
Step 3: You have your leaves by now, right? Well, you don’t just stop there. Continue and heat a pot of water to boil, and then submerge the chard inside the boiling water for about 3 minutes.
Step 4: After 3 minutes of boiling, remove the chard and then put the blanched leaves into a large bowl or sink of cold water in order to allow them to cool. Now grab handful of the chard and squeeze all the water out.
Step 5: The next step is shaping the blocks of chard until you get your desired shape and size. However, ensure that you get easy blocks that you can use in future.
Step 6: Put the blocks on a cookie sheet and freeze them in a freezer. Once they are fully frozen, go ahead and remove them from the sheet and then package into freezer containers. Store them in safe and dry place.
Important Things to Note
The harvesting and separation can be easy and delicate in equal measures, depending on how well you follow the procedure. It is important that you keep the following in mind:
- Always pick the chard in the morning when it is not too hot. You can also pick them in the evening when sun sets. This ensures that the leaves are fresh when you start preparing them.
- Start by picking the largest leaves first as they are the least likely to grow and the fact that they allow the small ones to soak in more sun.
- When blanching, do not heat the leaves more than the recommended time. The purpose of heating is to kill enzymes that may lead to deposition.
Do you have any tips for when it’s time to harvest Swiss chard?
The post Instructions: How To Harvest Swiss Chard appeared first on Gracious Gardening.
]]>The post Grow Your Own Delicious Mushrooms appeared first on Gracious Gardening.
]]>Pick One
Start by educating yourself on your different types of mushrooms. What goal do you have in mind? Do you like them for salads or soups? Do you want to steam them and eat them salted or stuffed? Different mushrooms will yield different results for you to decide. White button mushrooms are hardy and plentiful, and are great for salads and soups. Oyster mushrooms are more mild, and have a wonderful flavor that’s great for stir-fries and soups. Shiitake mushrooms are a more substantial mushroom, its smoky flavor makes it a great substitute for meat, which makes this one a vegan favorite.
Get Your Substrate
To grow mushrooms, you’ll need what’s called, “substrate” which is essentially a growing environment for the mushroom which you will inject with the mushroom spawn. Each type of mushroom has a different substrate. The easiest way to determine what you need is to purchase a mushroom growing kit, which comes with the substrate pre-mixed and ready to grow. The kit will come with a syringe and spawn, as well. Once you inject your substrate with your mushroom spawn, you’ll want to keep it warm, at about 70 degrees, for 2 weeks. Beyond that, drop the temperature and keep the mushroom in a cooler setting for the remainder of its growth.
Select Your Environment
Unlike other plants you’ll grow, mushrooms require dark, damp places. Find some good shade that stays generally moist. Your target temperature will be around 60 degrees, which means in some places they can be grown year round. Mushrooms also need lots of moisture. If you can plant them next to a stream or where there’s plenty of humidity, do it, as your crop will yield better results.
Keep it Covered for a While
Now that your mushroom has formed roots and you’ve found a great environment for it to grow in that meets the temperature, shade and moisture requirements, you’ll want to plant the mushroom underground and cover it with about an inch of soil. From there, cover the soil with a layer of newspaper or peat moss, something that will keep it moist but protect it from the elements or direct contact with water (like rain). Spritz the newspaper layer several times daily for at least 10 days. After 10 days, remove the paper. Continue misting the soil daily until you see your mushrooms begin to pop up.
Pick It
Once your mushroom has grown to the size of your liking, pick it, wash it, and enjoy! What’s great is that most spawns will re-grow for more crops, meaning that you’ll yield twice what you grow each year.
Growing mushrooms isn’t complicated, it just requires a little research and a specific environment. Follow these guidelines, and you’ll have fresh mushrooms the use in your cooking in no time!
Do you have any tips for growing mushrooms?
The post Grow Your Own Delicious Mushrooms appeared first on Gracious Gardening.
]]>The post Simple Garden Fresh Recipes appeared first on Gracious Gardening.
]]>
Most of us have vegetable gardens for the simple fact that we can grow our own food. Depending on what you are growing in your garden, you can make all sorts of food: from appetizers and salads to main courses and even deserts.
Simple garden fresh recipes
Berries
If you happen to be growing things like berries, these are great for all sorts of things. Raspberries, strawberries, blackberries and blueberries simply burst with sun kissed, juicy flavor. These berries are more than simply a great perk of the season, they also happen to be packed with vitamins and they are rich in both antioxidants and fiber that can help you in the fight against quite a few chronic diseases.
They are versatile in the kitchen too. You can sprinkle some of your favorites on cereal or yogurt or just add them to your homemade ice cream recipes. You might decide to mix them into the pancake batter or make some muffins with them. You can make smoothies with them on those super – hot days or add them to some salsa for a sweet kick. They are also great in salads!
Green Beans
If you happen to be growing green beans there are many things that can be made with them too, even though they are not as versatile as the berries. Think about making a balsamic bean salad with them. Just throw in some of your tomatoes and an onion from your garden along with some feta cheese, pepper, ground mustard, garlic powder, salt, balsamic vinegar, lemon juice and olive oil and this could be a starter or an entrée.
Don’t forget green bean casserole. That’s usually a hit regardless of the season. You could go with green bean vinaigrette or have some garlic green beans with pine nuts. As with the berries, even though they lack a bit of the versatility, there are still plenty of dishes that can be made with green beans.
Tomatoes
In many households, tomatoes are a staple and there is nothing better than a fresh from the garden tomato. Use tomatoes in sauces, salads, entrees, sandwiches and more. Create your own recipes using tomatoes.
Cucumbers
Cucumbers are another garden staple. Use these fresh in salads or on sandwiches or use them to make your own pickles. You can even use these as a facial treatment! There are so many things that you can do with cucumbers.
Peppers
Although not everyone can take the heat, there are all kinds of peppers. Peppers are also great in salads as well as in salsa, use them as entrees (think stuffed peppers) and even as an appetizer. They are also great when paired with tomatoes and other garden fresh veggies on a kebab.
This holds true with nearly everything in your garden. You can put some of your harvest up for future use by canning or freezing the veggies. There are so many different foods, snacks, meals, etc. that can be made with fresh foods from your garden.
What are your favorite garden fresh recipes?
Image: iStockPhoto
The post Simple Garden Fresh Recipes appeared first on Gracious Gardening.
]]>